Create Locally-Managed Cloudflare Tunnel

A hostname that must still exist tomorrow uses a locally managed Cloudflare Tunnel: cloudflared holds the credentials, reads config.yml, and opens outbound connections only. Skip a dashboard-managed tunnel — that config does not live in git. Skip cloudflared tunnel --url and its trycloudflare.com name. Stop the process, and the name is gone.
Pick / skip
| Pick | Skip |
|---|---|
A named tunnel plus a local config.yml |
Ingress edited only in the dashboard |
cloudflared tunnel route dns onto a real hostname |
Storing *.trycloudflare.com in someone else’s admin console |
Origin bound to 127.0.0.1 |
Opening a router port for convenience |
cloudflared as a system service |
nohup as a supervisor |
| Credential files treated as keys | Committing cert.pem or <UUID>.json |
How it works
Cloudflared establishes outbound connections (tunnels) between the origin and Cloudflare’s global network. Tunnels are persistent objects that route traffic to DNS records. Within the same tunnel, run as many cloudflared processes (connectors) as needed. These processes will establish connections to Cloudflare and send traffic to the nearest Cloudflare data center.
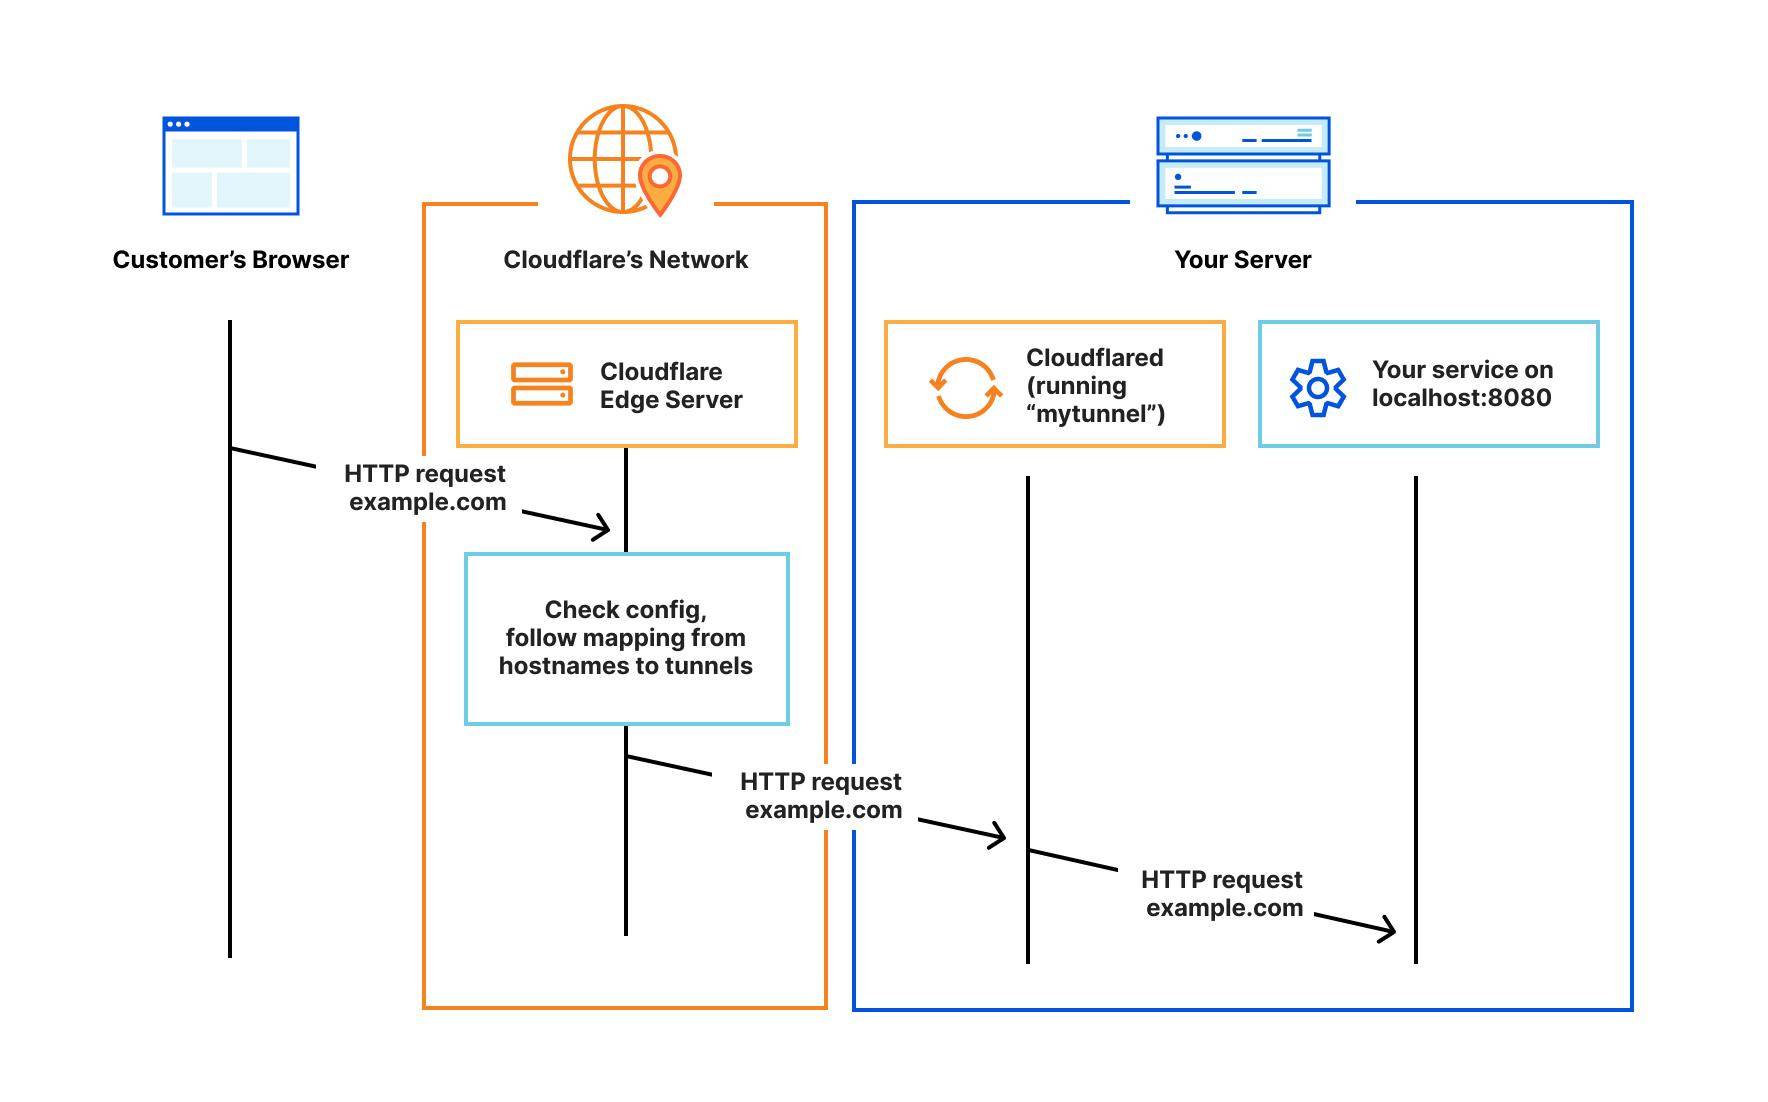
Prerequisites
Before starting:
1. Install cloudflared
Windows
- Download cloudflared on the machine. Visit the downloads page to find the right package for the OS.
- Rename the executable to cloudflared.exe
- In PowerShell, change directory to the Downloads folder and run
.\cloudflared.exe --version. It should output the version ofcloudflared. Note thatcloudflared.execould becloudflared-windows-amd64.exeorcloudflared-windows-386.exeif the file was not renamed.
PS C:\Users\Administrator\Downloads\cloudflared-stable-windows-amd64> .\cloudflared.exe --versionmacOS
To download and install cloudflared:
brew install cloudflaredAlternatively, download the latest Darwin amd64 release directly.
Linux
Debian and Ubuntu APT
Use the apt package manager to install cloudflared on compatible machines.
- Add Cloudflare’s package signing key:
sudo mkdir -p --mode=0755 /usr/share/keyrings
curl -fsSL https://pkg.cloudflare.com/cloudflare-main.gpg | sudo tee /usr/share/keyrings/cloudflare-main.gpg >/dev/null- Add Cloudflare’s apt repo to the apt repositories:
echo "deb [signed-by=/usr/share/keyrings/cloudflare-main.gpg] https://pkg.cloudflare.com/cloudflared $(lsb_release -cs) main" | sudo tee /etc/apt/sources.list.d/cloudflared.list- Update repositories and install cloudflared:
sudo apt-get update && sudo apt-get install cloudflaredRHEL RPM
Use the rpm package manager to install cloudflared on compatible machines.
- Add Cloudflare’s repository:
curl -fsSL https://pkg.cloudflare.com/cloudflared-ascii.repo | sudo tee /etc/yum.repos.d/cloudflared.repo- Update repositories and install cloudflared:
sudo yum update && sudo yum install cloudflaredArch Linux
cloudflared is in the Arch Linux community repository. Use pacman to install cloudflared on compatible machines.
pacman -Syu cloudflaredOther
Alternatively, download the cloudflared binary or the linux packages to the machine and install manually. Visit the downloads page to find the right package for the OS.
Build from source
To build the latest version of cloudflared from source:
git clone https://github.com/cloudflare/cloudflared.git
cd cloudflared
make cloudflared
go install github.com/cloudflare/cloudflared/cmd/cloudflared
Depending on where the binary was installed cloudflared, move it to a known path as well.
mv /root/cloudflared/cloudflared /usr/bin/cloudflared2. Authenticate cloudflared
cloudflared tunnel loginRunning this command will:
- Open a browser window and prompt a login to the Cloudflare account. After logging in to the account, select the hostname.
- Generate an account certificate, the cert.pem file, in the default cloudflared directory.
3. Create a tunnel and give it a name
cloudflared tunnel create <NAME>Running this command will:
- Create a tunnel by establishing a persistent relationship between the name provided and a UUID for the tunnel. At this point, no connection is active within the tunnel yet.
- Generate a tunnel credentials file in the default cloudflared directory.
- Create a subdomain of
.cfargotunnel.com.
From the output of the command, take note of the tunnel’s UUID and the path to the tunnel’s credentials file.
Confirm that the tunnel has been successfully created by running:
cloudflared tunnel list4. Create a configuration file
-
In the
.cloudflareddirectory, create a config.yml file using any text editor. This file will configure the tunnel to route traffic from a given origin to the hostname of choice. -
Add the following fields to the file:
When connecting an application:
url: http://localhost:8000
tunnel: <Tunnel-UUID>
credentials-file: /root/.cloudflared/<Tunnel-UUID>.json
When connecting a private network:
tunnel: <Tunnel-UUID>
credentials-file: /root/.cloudflared/<Tunnel-UUID>.json
warp-routing:
enabled: true- Confirm that the configuration file has been successfully created by running:
cat config.yml5. Start routing traffic
-
Now assign a
CNAMErecord that points traffic to the tunnel subdomain:- When connecting an application, route the service to a public hostname:
$ cloudflared tunnel route dns <UUID or NAME> <hostname>- When connecting a private network, route an IP address or CIDR through the tunnel:
$ cloudflared tunnel route ip add <IP/CIDR> <UUID or NAME> -
Confirm that the route has been successfully established:
$ cloudflared tunnel route ip show
6. Run the tunnel
Run the tunnel to proxy incoming traffic from the tunnel to any number of services running locally on the origin.
$ cloudflared tunnel run <UUID or NAME>If the configuration file has a custom name or is not in the .cloudflared directory, add the --config flag and specify the path.
$ cloudflared tunnel --config /path/your-config-file.yml run <UUID or NAME>Cloudflare Tunnel can install itself as a system service on Linux and Windows and as a launch agent on macOS. For more information, refer to run as a service.
7. Check the tunnel
Tunnel configuration is complete. To get information on the tunnel just created, run:
$ cloudflared tunnel info <UUID or NAME>Now route traffic to the tunnel using Cloudflare DNS or determine who can reach the tunnel with Cloudflare Access.
Useful commands
Use these commands to manage local tunnels through the CLI.
Manage tunnels
| Command | Description |
|---|---|
cloudflared tunnel login |
Prompts a browser window to authenticate the tunnel to the Cloudflare account. |
cloudflared tunnel list |
Displays all active tunnels, their creation time, and associated connections. Use the -d flag to include deleted tunnels. |
cloudflared tunnel create <NAME or UUID> |
Creates a tunnel, registers it with the Cloudflare edge and generates a credential file to run this tunnel. |
cloudflared tunnel route |
Routes traffic through a tunnel. |
cloudflared tunnel route lb <NAME or UUID> <load balancer name> <load balancer pool> |
Creates a Load Balancer with an origin pool that points to the tunnel. |
cloudflared tunnel route ip add <IP/CIDR> <NAME or UUID> |
Adds any network route space (represented as a CIDR) to the routing table. That network space becomes reachable for requests egressing from a user’s machine as long as it is using Cloudflare WARP and is enrolled in the same account that is running the tunnel chosen here. Further, those requests will be proxied to the specified tunnel, and reach an IP in the given CIDR, as long as that IP is reachable from the tunnel. To assign the IP route to a specific Virtual Network, use the --vnet option. |
cloudflared tunnel route ip show (or list) |
Shows the organization’s private routing table. Additional flags can be used to filter the results. |
cloudflared tunnel route ip delete |
Deletes the row for a given CIDR from the routing table. That portion of the network will no longer be reachable by the WARP client. |
cloudflared tunnel route ip get <IP/CIDR> |
Checks which row of the routing table will be used to proxy a given IP. This helps check and validate the configuration. |
cloudflared tunnel route dns |
Creates a DNS CNAME record hostname that points to the tunnel. |
cloudflared tunnel --config path/config.yaml run <NAME or UUID> |
Runs a tunnel, creating highly available connections between the server and the Cloudflare edge. Provide name or UUID of the tunnel to run either as the last command line argument or in the configuration file using tunnel: <NAME>. |
cloudflared tunnel info <NAME or UUID> |
Displays details about the active connectors for a given tunnel identified by name of UUID. |
cloudflared tunnel cleanup <NAME or UUID> |
Deletes connections for tunnels with the given UUIDs or names. This is useful if an error appears trying to delete or run a tunnel after cloudflared is not shut down gracefully (for example, if a kill command is issued). |
cloudflared tunnel cleanup --connector-id <CONNECTOR-ID> <NAME or UUID> |
Disconnects and deletes a cloudflared replica with the given connector ID. View all replicas for a tunnel by running cloudflared tunnel info <NAME or UUID>. |
cloudflared tunnel delete <NAME or UUID> |
Deletes tunnels with the given name or UUID. A tunnel cannot be deleted if it has active connections. To delete the tunnel unconditionally, use the -f flag. |
cloudflared tunnel vnet add <NAME or UUID> |
Creates a Virtual Network to which IP routes can be assigned. To make this Virtual Network the default for the Zero Trust organization, use the -d flag. |
cloudflared tunnel vnet delete <NAME or UUID> |
Deletes the Virtual Network with the given name or UUID. Before deleting a Virtual Network, must first delete all IP routes assigned to the Virtual Network. |
cloudflared tunnel vnet list |
Displays all active Virtual Networks, the default Virtual Network, and their creation times. |
cloudflared tail <UUID> |
Start a session to livestream logs from a specific tunnel. For more information, refer to Tunnel logs. |
Manage cloudflared
| Command | Description |
|---|---|
cloudflared update |
Looks for a new version on the official download server. If a new version exists, it updates the agent binary and quits. Otherwise, no action is performed. This command only works if cloudflared was installed from GitHub binaries or from source. For more information, refer to the update instructions. |
cloudflared version |
Prints the cloudflared version number and build date. |
cloudflared help |
Shows a list of commands or help for cloudflared. |
How a failure shows up
A missing catch-all (ingress with a hostname and no final http_status:404) makes cloudflared refuse to start. Bind the origin to 127.0.0.1. A VPS that already has a public IP and only needs TLS should use Caddy, not another tunnel hop. Treat cert.pem and <UUID>.json as keys: ~/.cloudflared mode 700, files 600, never in git. A trycloudflare.com name belongs in a private note, not in someone else’s admin console. Two machines should not run the same named tunnel; read cloudflared tunnel info first.